Configuring the scan volume
When is it necessary?
The LMI 3D scanner has three configurations:
- for small objects
- for medium objects
- for large objects

The scanner needs to be re-calibrated every time the position of the camera's change.
It does not need to be recalibrated after moving or rotating / tilting the scanner.
Follow these steps carefully and in the right order.
Estimated time: 30 minutes
The scan-quality of the new configuration depends on the precision the calibration is completed.
Warnings
- Never use the menu of the projector.
- Be careful with the 3D scanner.
- Do not skip steps or you will have to start over.
1. Hardware configuration
Set the camera configuration (close, mid, far).

Secure one camera with one hand, while you unscrew it with the other hand.

Relocate it to another spot. Make sure both camera's will be positioned symmetrically and secure them again firmly.

set projector zoom (physical knob only)
- Make the image as large as possible for the largest scanning area
- Set the zoom halfway for the middle configuration
- Make the image as small as possible for the smallest scanning area
2. Calibration card distance
Make sure the 3D scanner is connected to the laptop: 1 HDMI cable, and 2 blue USB cables.
Start up the projector.
![]()
Start FlexScan3D

Go to the Scanners tab

Set projector pattern to focus. The projector should show a crosshair-pattern.

Choose a calibration card and attach the feet so it can stand up on it's own.
- 20mm for the large scanning volume
- 15mm squares for the medium scanning volume
- 10mm squares for the small scanning volume
Always treat the calibration cards with care.

Test that the two camera's are working: wave your hand in front of them, and check if the camera images on the laptop show the movement.

If one of the camera's doesn't work. Disable and then reenable this button.
If the camera is not recognised, restart FlexScan3D and try again.
With the projector pattern still set to focus, turn the white side of the calibration card to the cameras.

Align the center mark (bullseye) of the projection to the vertical red line in the camera view by moving the calibration card away or toward the scanner.
Mark this distance with some tape.
3. Focus projector


Set the projector focus. (Look at the actual calibration card, not the images from the cameras)
4. Focus cameras
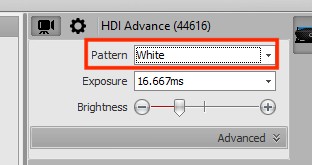
Set the projector pattern to white
Turn the calibration card so that the checkered side faces the cameras.

Loosen the screws on the focus ring (the smallest of the two) of both camera’s. Just a full turn should be enough.
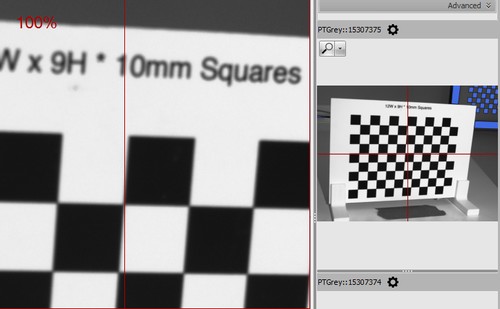
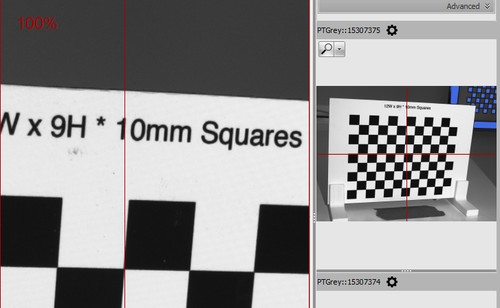
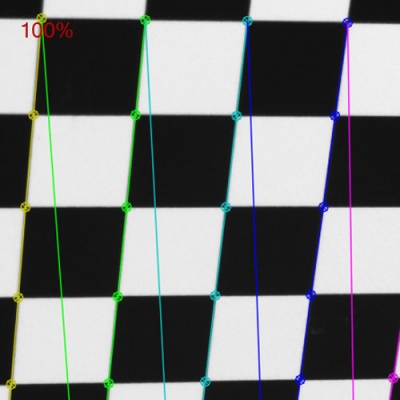
Hover the mouse over the camera view. A window pops up with a section of the image in 100%. Set the camera focus while looking at this popup window for sharpness.
Fasten the lock screw without moving the focus ring.
5. Set exposure

Expose the image of the cameras well by changing the projector brightness.
Try to minimise under and over exposure on the calibration card.
6. Calibrating

Match the size of the squares of the calibration card.
Make sure sensible Filter values are set. (no documentation found on where the values are measured from. Possibly the CCD location of the camera's).
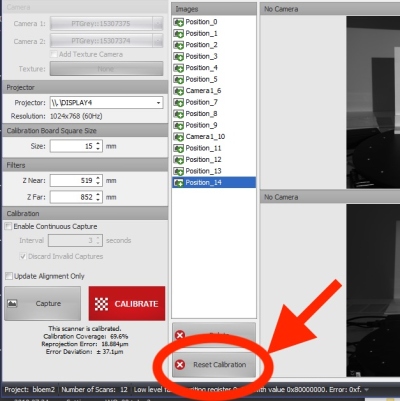
Click “Reset Calibration” to remove the previous calibration

Capture shots of the calibration board. Move the calibration board to a different place for the next capture. Stay within the camera image as this will result in an invalid capture. It's not necessary to overlap the board with previous captures. Take your time and be patient.
Try the following:
- capture a horizontal row where the board faces the cameras:

- do the same row, but now with the board at an angle:

- move the board further or closer to the camera for about 6cm and repeat the above steps
- do this for approximately the same depth as the scanning volume is wide.
- Tilt the scanner up or down (carefully turn the knobs on the tripod) and repeat the above steps to get images higher and lower in the scanning volume.
You will need 40 or more images for a good quality calibration.

When you feel ready, click calibrate

After a successful calibration, go to the projects tab to start 3D scanning