This is an old revision of the document!
Engraving detailed images
Fusion 360's sketch engine is not built for vector images with lots of detail. Here are some tips based on this article to try make it work. The key is to keep sketches simple. That's why we'll try to spread the information over multiple sketches. We will split up the vector image into multiple tiles in Illustrator.
Keep the document units the same throughout the workflow (mm for example)
- In Illustrator, simplify the vector drawing as much as possible.
- Separate elements into different layers
- Clusters can be cut (illustrator: divide option in the pathfinder) and separated into different layers. For this to work, the cutting object shouldn't be a closed shape.
- Export from Illustrator to DXF (exporting to DXF from Inkscape resulted in strange artefacts).
- Import in Fusion 360 with the option of
One sketch per layeroption enabled.
Negative space
For cutting the area in-between the shapes (to use as a stamp for example):
- In Illustrator:
- Set the document units to mm
- Draw guides to define where the tiles should go:

Notice the double lines. This is overlap so we're not running into problems cutting thin walls on the edges. - This process ruins the vector image. So always work on copies of it.
- Draw squares where you want the tiles to be (with a bit of overlap). Give them a stoke colour that's different than the image vectors (red for this example):

- Select the image vectors and the rectangle.
- click 'divide' in the pathfinder:


- The two layers have merged into one. You can delete the empty one:
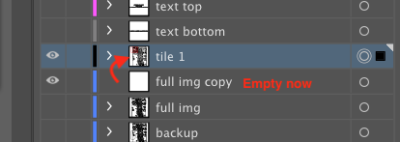
- Ungroup the square and the image.
- Select a part of the image (a back shape in this case) and go to
Select > Same > Appearance. Delete it:

- The black shapes are internal cavities that weren't reached by the red shape. Select them and give them the same outline thickness and color. (Probably not necessary).
- Give this layer a clear name. Hide it and repeat for the other tiles.
- After all the contours for the tiles have been made, select all the vectors and export:
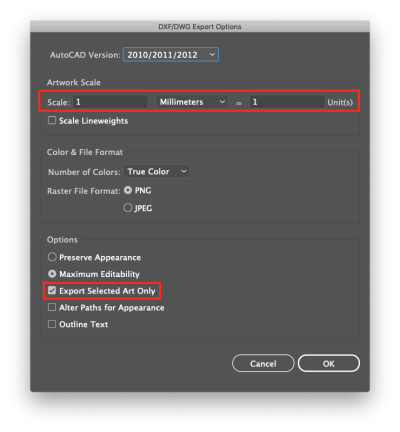
- Go to
File > Export > Export as…. Set the format todxfand click Export. - In the export options, make sure a unit represents a millimeter. Check the option
Export Selected Art Only. Click OK:


- In Fusion:
- import one sketch per layer
- use the sketch to extrude a body
- 3D adaptive
- then engrave