Table of Contents
Clean up a 3D scan made with the Occipital Structure scanner
The 3D files from the Structure scanner often have holes and unwanted geometry. After following this guide you'll get a watertight model that is ready for (colour) 3D printing. A basic understanding of mesh manipulation in Blender is necessary. This guide uses Blender, but here is a guide that describes this process for Meshmixer.
Basic cleanup
Open the file
The structure scanner delivers the 3D object in 3 parts:
Model.objis the 3D objectModel.jpgis the texture fileModel.mtlis a file that links the object to the texture.

You only have to open the .obj file. The program will find the other files on its own:
File > Import > Wavefront (obj). Choose the.objfile
Setup the mesh
- Make the mesh active (yellow contour lines instead of orange)
left mouse click - Right click on the mesh and select
Set Origin > Geometry to origin. - Scale the object to a reasonable scale to work on. Avoid zooming in to a mesh that's super tiny or zoom out to one that's crazy big.
- Rotate until the object is upright.

Join fragments to a single mesh
The scan data coming from the Occipital Structure sensor isn't yet joined in a single mesh. It consists of multiple sections that overlap on the edges. To test this, hover the cursor over the object and go to Select > Select Linked > Linked (Shortcut: l) (lower caps L). This selects all vertices that are linked. As you can see, only a single section is selected.
- Select all:
Select > All(shortcut:a). Mesh > Clean Up > Merge by Distance. The default distance should do.- Reset normal vectors:
Mesh > Normals > Reset Vectors

Auto-fix holes
- To see if there are any holes in the mesh, go in Edit mode and go to
Select > Select All by Trait > Non manifold. This will select all vertexes on the edges of holes:

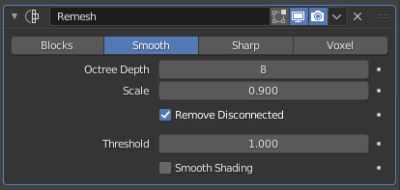
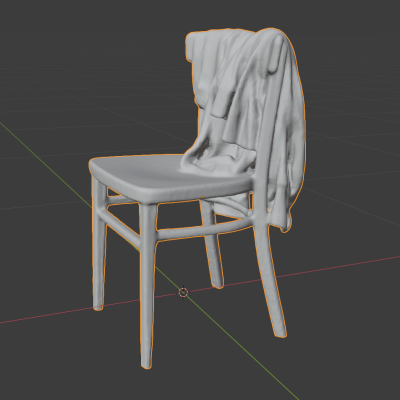
Apply a remesh modifier to the object and tune the parameters until the object is defined properly:
- Try selecting the non-manifold vertexes again. If there are still some selected, repeat the above process, or export the object to Meshmixer to remesh it there.


The 3D print add-on for Blender is helpful in preparing your object for 3D printing: enable the add-on 3D-Print Toolbox in the Blender preferences.
Delete unwanted geometry
Cut away unwanted parts, like the surface the model was standing on.
- Add a cube. Scale and position so it overlaps with the unwanted geometry.
- Select the 3D scan mesh.
- Add Boolean modifier and leave the operation as Difference.
- Select the cube as the mesh to use for the boolean.
- Apply the modifier.

Delete loose parts
- Deselect all:
Select > None(shortcut:alt + a). - Hover the cursor over the mesh you want to keep and press
l(lower caps L). - Invert the selection:
Select > Invert(shortcut:cmd + i) - Delete the selected vertices
Mesh > Delete > Vertices(shortcut:x > Delete Vertices)

More advanced cleanup
Redistribute vertices
The 3D scanner generates a mesh with messy topology. There are areas with very large faces, and others where there are lots of vertices crammed together. This creates visible stress points in the mesh. The relax function moves the vertices away from densely populated areas in order to be more equally distributed. Having the mesh relaxed will prevent a series of problems later on. This will change the shape of the mesh a little bit though.
- Select all vertices
a - Relax Vertices:
Vertex > Relax. A single iteration will do.

Manually Fill Holes
Tiny Holes
Fill tiny holes by merging vertices together. This way the texture will stay visible.
- Select the first vertex.
left mouse button - Add the second vertex to the selection.
shift + left mouse button - Merge them together:
Vertex > Merge Vertices > At Last(shortcut:alt + m > Merge At Last).

Medium Holes
Clean up the edge
- Manually clean up the edges of the holes. The scanner tends to leave the edges of larger holes curved inward. Select and delete the connecting vertices. Then the excess surface is floating and can be deleted by hovering over it with the cursor and then pressing
l(lower caps L) to select and then delete all linked vertices. - Merge together irregularities like outward or inward triangles. Try to make the edge of the hole somewhat smooth.
- Looking from the side, pull out the edge vertices so they follow the curve of the skin around the edge.

Fill in the gap
- fill: Face > Fill (shortcut: alt + f)

Retexture
New faces added to the mesh appear black or show random colours. They are referencing meaningless parts of the texture. Let's project the selected vertices to the texture and clone the surrounding texture onto that area.
- In the UV Editing workspace, unwrap the current selection.
UV > Unwrap(shortcut:u > Unwrap). - Scale down the selection in the UV editor and position it over a not yet textured area.
- Switch to the Texture Paint workspace, Select the clone brush and set the source for the brush
Ctrl + left mouse click(the 3D cursor will indicate the position). Now you're ready to draw. - After drawing save the texture image(!). Otherwise you'll have to redo the work.

Big Holes
When the holes are big, closing them with Vertex > New Edge/Face from Vertices (shortcut: f) results in a flat surface that interrupts the flow of the shape. Here are two ways to reconstruct the natural curve of the object. Clean up the edge of the hole as described above.
Using Grid Fill
- Make sure there are an even number of vertices on the edge of the hole. If not, merge two vertices together. On the bottom status bar the selection count is displayed. Using grid fill with an uneven number results in a 'Select two edge loops' warning.
- Try one of these selection modes:
- Select two opposing edge loops
- Select all the vertices of the edge of the hole. No selected faces are allowed.

- Fill using the 'grid fill' method.
Face > Grid Fill. - Play with the Grid Fill options until a proper fit.
- Span makes different connection patterns.
- Offset rotates the connection pattern with the edge vertices.
- Simple Blending tries to curve the new surface according to the edge vertices. It doesn't take the existing geometry in account. Meshmixer does a better job with smooth hole filling.

Both versions aren't perfect. Mesh stress areas are marked with the red circles.
Clean up dark spots by resetting the normal vectors:
- Go to Edit Mode
- Select all vertices
Mesh > Normals > Reset vectors- Go back to object mode

Clean up visible edges with the smoothing brush in the Sculpting workspace.
Fill a big hole the manual way
This is more tedious, but it allows for better control over the shape .

- With the edge vertices selected, go to
Vertex > New Edge/Face from vertices. (shortcut:f) to fill the gap with a single n-gon. - Shape the n-gon step by step by selecting opposing vertices and joining them:
Vertex > Connect Vertex Path(Shortcut:j). This will not create overlapping faces, but instead divides the current n-gon in half. The new vertex path will include any edge it runs through. This method allows you to define the new surface in steps, going from a rough definition to fine surface details.

Gradually defining the shape
Tips:
- Move vertices along the edges they're connected to:
Vertex > Slide Vertices(Shortcut:shift + vordouble tap g) - Get a smoother result with proportional editing enabled
- If you need to delete elements (vertices, edges or faces), dissolve rather than delete them.
Mesh > Delete > Dissolve …(shortcut:ctlr + x) This way you keep the existing faces intact instead of making a hole.
Retexturing is the same as described above.
Normals
- Go to edit mode and select all vertices
- Recalculate normals:
Mesh > Normals > Recalculate Outside(Shortcut:shift + n). - If the visualisation lines are pointing inwards, select all vertices,
Mesh > Normals > Flip.

Show the face normals for a visual check. In Edit mode: Overlays > Enable face normals.